
I have come to enjoy coding in Solidity because it offers so much in innovative features.I have written about the “_” modifier in a previous article. In this article, I wish to document what emit in Solidity does.
An emit in Solidity triggers an event. Think of an event as a click on a button on a user interface – but that’s not the type of event that a Solidity Smart Contract triggers. Here’s an example of what an event means in Solidity using my previous article “Creating Smart Contract with Smart Contract”
Showing a Smart Contract Address on a Web Interface on Successful Deployment
It currently takes around 20 seconds for a Smart Contract to be deployed on the Ethereum Blockchain. This means that if I design a DApp to let my user click a [Create Purchase Contract] button to deploy a new Purchase Contract, he will need to wait around 20 seconds before the contract deploys itself.
That’s a long time to wait! To keep him entertained, I will keep a cute spinner running while he waits.

And when the Purchase Contract has been successfully deployed, the Contract address comes up.

To do this requires the Solidity Smart Contract to emit an event when the contract has been successfully deployed and to watch and react to this event in my DApp.
Emitting an Event from Smart Contract
Here’s how this is done with emit.
I have added several new lines of codes in StartEscrow.sol.
event newPurchaseContract(
   address contractAddress
);
The event newPurchaseContract was added in lines 7 to 9. It says here that when this event occurs, I will like to know the Smart Contract’s address so that I can display it.
When a new Purchase Contract is deployed, the event above will be triggered.
// deploy a new purchase contract
function newPurchase()
    public
    payable
    returns(address newContract)
{
    Purchase c = (new Purchase).value(msg.value)(address(msg.sender));
    contracts.push(c);
    lastContractAddress = address(c);
    emit newPurchaseContract(c);
    return c;
}
These codes come from lines 25 to 36. Pay special attention to the line emit newPurchaseContract(c);. Here’s where the event newPurchaseContract() is triggered to happen with the contract address c passed into the newPurchaseContract() event.
Listening for the Event in the DApp
Now our web application needs to listen for the newPurchaseContract() event which occurs on successful deployment of a new Purchase Contract. Here are the codes.
And these are the parts of the web application to pay attention to.
<div class="panel panel-default">
   	<div class="panel-heading">New Purchase Contract</div>
    <div class="panel-body">
      	<div class="form-group">
    		<label for="price">Value in ETH (Twice of price)</label>
    		<input id="price" class="form-control" type="text">
       	</div>
       	<div class="form-group">
       		<button class="btn btn-primary" id="button">Create Purchase Contract</button>
           	<img id="loader" src="https://loading.io/spinners/reload/index.ajax-syncing-loading-icon.svg">
       	</div>
    </div>
</div>
In lines 16 to 28, I draw the user interface for the user to enter the value (in ETH) of the item he is selling. A button that says [Create Purchase Contract] is defined. I also define an img tag with a spinner. If you don’t find my spinner cute enough for you, go ahead to make your own here. In my stylesheet, I hid the spinner by setting display:none for now but will make it show up when the user starts waiting for the Purchase Contract to be deployed.
if (typeof web3 !== 'undefined') {
	web3 = new Web3(web3.currentProvider);
}
else {
	// set the provider you want from Web3.providers
    web3 = new Web3(new Web3.providers.HttpProvider("http://localhost:8545"));
}
Between lines 39 and 44, I check if web3 is defined. create.html will figure if web3 is defined if it is opened in a Chrome browser with MetaMask running as a plug-in, or on a mobile device, running with Status.im. In the event none of these are true, it looks for a Geth node running locally on the computer that create.html is running on.
web3.eth.defaultAccount = web3.eth.accounts[0];Your digital wallet may have more than 1 account in it. Line 46 assumes that you want to use the first one by default.
var StartEscrowContract = web3.eth.contract(
[
{
"constant": false,
"inputs": [],
"name": "newPurchase",
"outputs": [
...
...
...
...
]
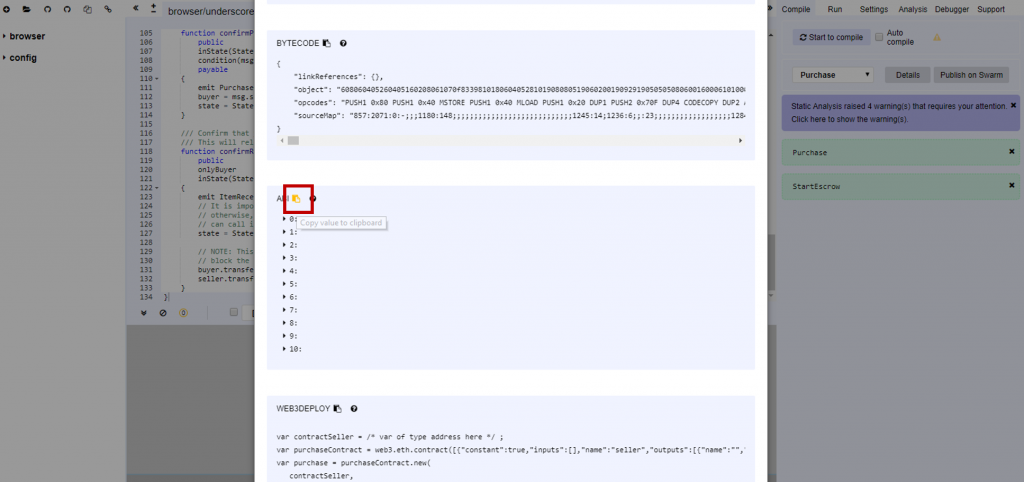
);Lines 48 to 149 is where you will copy and paste the StartEscrow.sol Smart Contract ABI into. You can get it by going to Remix, clicking [Details], scrolling down to the ABI to copy your Smart Contract’s ABI and pasting it here.
var StartEscrow = StartEscrowContract.at('0x660DA9eCd262170AD00a2702103074EfA9aD0103');
console.log(StartEscrow);
Line 51 lets you copy and paste the address of the Smart Contract that you have previously deployed on the Ethereum Blockchain.
var newPurchaseContractEvent = StartEscrow.newPurchaseContract();
newPurchaseContractEvent.watch(function(error, result){
	if (!error)
	{
		$("#loader").hide();
		$("#contractaddress").html("Contract: " + result.args.contractAddress);
	}
	else {
		$("#loader").hide();
		console.log(error);
	}
});
Here’s where the magic happens – between lines 154 and 164. We instantiate a newPurchaseContractEvent. And then we watch and wait for the event to be emitted from the StartEscrow.sol that is now running on the Blockchain. Notice that StartEscrow.newPurchaseContract() is the event declared in StartEscrow.sol – this is what we are watching and waiting to be emitted.
When the event is finally emitted, we hide the cute spinning logo and display contractAddress (which was passed over when the event is emitted) in the #contractaddress div in our UI).
$("#button").click(function() {
	$("#loader").show();
	StartEscrow.newPurchase({value: $("#price").val()*1000000000000000000, gas: 1000000, gasPrice: web3.toWei(2, 'gwei')}, function(error, result){
	if(!error)
		console.log(JSON.stringify(result));
	else
		console.error(error);
	});
});
Lines 166 to 175 handle the event where the user presses the [Create Purchase Contract] button. Again, we need to wait, so we show the cute spinner. We execute newPurchase in StartEscrow.sol by passing in the price that the user enters. Here, the price is multiplied by 1000000000000000000 because this value is converted from ETH to Wei (1ETH = 118 Wei).
What’s Next?
There are several more features to build so that Escrow Service becomes a usable solution. The seller should be able to monitor the Purchase Contracts that he has initiated and the buyer should be able to select Purchase Contracts to confirm that he is purchasing and when he has received the shipment.
I will build these features in the next iteration and document it in my next article.
I have referred to this tutorial at coursetro when writing this article.
Photo by Jodie Stallard on Unsplash